

Hi All,
just wanted to say thank you to all that left a comment. It is truly appreciated and I am glad to share these with you.
Now I started to just answer this comment, but thought ....Uhmmm, others may want to know too. So....
jjred40 said...
thanks for sharing your awesome borders - how did you do these. I played around after watching Rob's video but didn't come up with anything this cute. How did you get the words inside the border? Thanks for sharing.
Here was going to be my response but sharing in case others were wondering also:
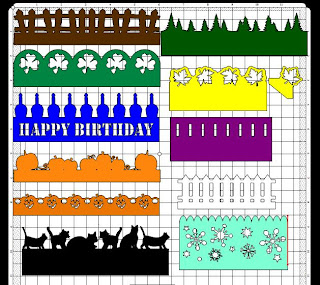
To get the words inside the border: You just type in the words in the add text group box and then place it on your mat. Then move/drag the word(s) "inside" of the border (rectangle) where you want them to be. Then you select all of the "rectangle/with words" and then just click on "join".....they are now in the border like the one in my Happy Birthday border.
PS.....I used the stencil font for this one. Remember when placing letters inside, think of how they will cut out. For instance an "a" the inside will be cut out so that you just have the edge layer....so you would have to somehow keep that inside to glue in place. The stencil font works great for these though.
As far as the other images. Just add them to your mat then place them along the border they way you want them placed. Make sure a little of the bottom edge of the image is touching the top (or bottom if you have the image descending) and once you have them overlapping "just a little" then select all of the border/images in one selection box, then do a weld. This makes it all one piece.....PS....you do not want to add any words until you have finished the weld....so that you can do a "join" with the letters. If you add the letters first "inside" of the border and click on weld they will disappear and be welded into the border.
Hope this helps with some questions about how to make these borders. The possibilities are whatever images you choose to work with....just think of a "theme" and go for it!!!
Wednesday, March 31, 2010
Monday, March 29, 2010
More Borders
NOTE:.....When you download these files, I have the images locked. On the Layers Property box click on the global lock at the bottom to unlock all images to move them around on the mat for cutting. **You will have to move the ones that are placed on the edge of the mat to move them from the grey/shaded border around the mat. Please leave me a comment if there are any problems so that I can help. Thanks, Sandy
And here are few more....I am having so much fun creating these.
 Click HERE for the .mtc file
Borders
I have been playing around creating borders that can be used for any papercrafting project.
Over at the MTC-Hints Yahoo Group (which I am a member of) this weeks challenge is to create a border(s). So here are a few I have put together. I am having fun with these.
If you would like to have this .mtc file, please click HERE.
The name of each border is listed in the Layers Property Box. I hope you enjoy them and find them useful.
I will be making more to post, check back again.
Over at the MTC-Hints Yahoo Group (which I am a member of) this weeks challenge is to create a border(s). So here are a few I have put together. I am having fun with these.

If you would like to have this .mtc file, please click HERE.
The name of each border is listed in the Layers Property Box. I hope you enjoy them and find them useful.
I will be making more to post, check back again.
Sunday, March 28, 2010
Videos to Share
Okay so I have had a Flip camcorder for awhile now and have played around with family videos. I am trying my "hand" at using it to do some tutorials. These are a few that I am starting with. Still working on the quality of them so please excuse if they are not at all "professional"....which they are only meant to be informative. So hopefully they will help you in learning and/or working in the Make The Cut software.
I will be doing quite a few of these "Short Take" videos focusing on "one" feature for each video. I work a 40 hour week so I may not get more updated until the weekends....so just remember to check back to see what other features I will be introducing.
Thanks for stopping by and HAVE A GREAT DAY!!!
Video Tutorial - Layer, Split and Break Features
And here is another video showing the differences of the Layer, Split and Break features used in Make the Cut as well as when to use them. Hope you find them helpful.
Video Tutorial - The Mirror and Flip Features
Here is another video that shows how to use the Mirror and/or the Flip features in Make the Cut. Hope you find it helpful.
Video Tutorial - The Selection Properties Box
Hi Everyone, here is another video I did showing how to use the Selection Properties Box. Hope you find it helpful.
Saturday, March 27, 2010
Video Tutorial - Customize Your Workspace in MTC
Hi everyone. I have attempted my first tutorial video. This video shows how to move things around and customize your workspace in Make The Cut.
Hope you enjoy it.
Hope you enjoy it.
Tuesday, March 23, 2010
Written Tutorial-How to Make A Shapebook in Make The Cut!

I have written another tutorial for using with the Make the Cut software. This tutorial will show you how to make a shapebook like the one pictured above. For ease, I have only created a 6 page book with only using 5 elements. You can create these books with as many pages as you desire that will fit on your mat and with as many elements as you have pages. The pages sizes in this tutorial are used for this demonstration, your pages can also be adjusted to the width and height that you desire.
To download this tutorial click HERE!
If you would like the MTC image used in the book:
For the Picnic Basket click HERE!
For the Sub-sandwich click HERE!
For the Ant click HERE!
For the Watermelon click HERE!
NOTE:!!! After making this tutorial, I left one step out that you will need for using these images in this book, this may not be necessary for any other images used. For the pieces that are welded to the pages, after making your second copy and removing it, using the first copy, break the image and remove all of the pieces except the background piece. This is the piece you will want to "weld" to the book. For some reason with these images, when I tried to weld the pieces the parts that were on the page welded, the parts off of the page did not weld.
Hope this tutorial helps you in creating these books. If you find that I need to elaborate more on a specific part of this tutorial or you are having difficulty with the tutorial, please leave me a comment so that I can help.
Sunday, March 21, 2010

Baby Shower ShapeBook, continued
This new version of MTC has made it so easy to do shapebooks now. With the prior versions you had to have a separate file for each page. With this new version and the layers feature, you can do it all on one page. I have put together this Baby Shower shapebook. For the picture below, I have the "eye" open on all pages to show the effects of the book and the layout of the pages. If you will notice at the bottom of this page are all of the page elements that will be cut.
 As you see in the picture above, all of the elements are on top of each other and I know you are wondering how do I cut them. But if you click on the "global eye" at the bottom of the Layers property box, it will close all layers and make them invisible so that your Cricut will not cut them. Then as you begin to do a page, click the "eye" on that layers page and it will only show the items to cut for that page, as shown below in the next picture. So for this picture you can move the pieces around if needed to like colors of cardstock on your real mat. Remember when cutting out shape books you will need to cut a second copy of the page layer for the back of the page.
 To cut the back of the page, you will need to place your cardstock face down on the mat and then cut the page layer again. You will not need to cut the elements again. Another option is to "flip" the page layer and then you can place your cardstock face up and cut.
In this file, with the elements being attached to the Page layers, you do not have an option to make just the "elements" invisible, so you will either need to move these to their own layer, or I find it easier to open up a new page in MTC, and then just do a copy of the page layer, click on the new page and do a Paste in Place, then cut using one of the two options above for the back of the page.
The Layer Properties box. I have labeled each "grouping" by Page numbers and within the Pages are the Page Layer itself and the elements for that page.

This shape book would be a great gift to give at a Baby Shower. After cutting the book, you can bind the book; my choice is to use my Bind-It-All, you may have another preference. Then you will want to create other page elements such as tags, mats for pictures, etc.
Some examples to include in the book could be: copy of the shower invitation, guests that attended, presents received, games played, refreshments served, etc.
Hope you like it and find it useful.
Hope you like it and find it useful.
Saturday, March 20, 2010
My shapebook is almost done...
I have been working on getting this finished for quite sometime now. Just have been really busy and even today trying to get this much done, my 3 granddaughters came up for the weekend. Thanks to my darling hubby, he kept them entertained playing outside for awhile while I worked on this. The only thing left now is to add more embellishments (tags, mats, stickles, ribbon, etc) and the pictures to the inside pages.
My Girl Scout troop (I was the leader for 11 years), went to Europe in 2007 for our last year of scouts. We did a 10 day tour visiting London, Paris and several cities in Switzerland. (The dragon is from the legendary Mt. Pilatus in Switzerland.)
I used the Make the Cut software program to create this shape book and several other images from clipart.

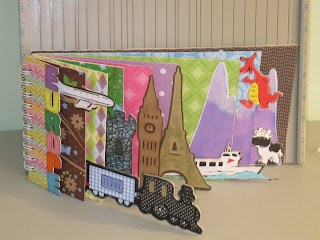
I used my Zutter bind-it-all to bind the book with white 3/4 inch O-wire. I just love this little machine it does a wonderful job in making these books.
 I am hoping to have the rest of the embellishments done very soon. I will then share a picture-video of the book to show all of the pages and all of the elements I used.
Again, thanks for looking and check back soon.
Chipboard or Posterboard
I have made a couple of shape books now and the previous shape books were made with brown chipboard that I got from the inserts that are in the boxes that reams of paper comes in. This is the chipboard. It is already sized at 8 1/2 by 11 inches.
 I am not quite happy at the results using this kind of chipboard. The edges show sort of a grey shade, which to me looks like an "unfinished" piece of work.
 The current book that I am working on, I wanted to try something different. So I bought several packs of this white posterboard at Wal-Mart. It comes in a pack of 5 pre-cut sheets of 11x14 in size. I wasn't sure if this would hold up sturdy enough or not, but decided to give it a try.
 The posterboard cut out very nice with the Cricut machine with no problems at all. I then used DCWV cardstock for my layers to attach to the front and back of the posterboard. This cardstock helped make the posterboard thicker. And it is just as sturdy as using the brown chipboard I had used previously. I am now convinced this is the type of material I will use for my shape/word books and was impressed at how "clean" the edges looked.
 I definitely would recommend using this posterboard for these projects.
Thursday, March 18, 2010
MTC Version 2.2.1 just released
Well it is official, the upgraded version of Make the Cut is out. It went through several more updates from the Beta version and is now Version 2.2.1. I have been playing with the new features and am really excited about the new version. If you haven't tried this wonderful software please click on the link under My Favorite Places to Visit to check it out.
Update: I have been steadily working on my Europe Shapebook and have all of the page layers added and will now be adding the embellishments. I am really pleased at how this is turning out and will be sharing it with you shortly. Please remember to check back in a few days I should have pictures to post by then.
Oh yeah and the "posterboard" I am using, purchased from Wal-Mart, is holding up as well as the brown chipboard. I do believe this will be what I use from now on. The white seams just look so much better than the brown seams.
Have a great day and remember check back soon for pics of my book.
Friday, March 12, 2010
MTC Beta Test is here!!
The new 2.03 version of MTC is now out for Beta Testing. It is not "officially" out yet. However, if anyone would like to start testing it out and giving feedback on it, you can download this version by clicking "HERE" and make sure to give feedback to the forum.
Here is my Review for now. (I am still testing and making my way through it)
This is going to be a great version. Working through the Beta testing I have found several things have changed.
The Objects Property box has been replaced with a Layers Box.
The Layers box is wonderful and makes choosing layers and coloring the layers so much easier. You no longer have to do a Shift-Tab to move through the different pieces.
The warp feature has changed. You no longer have a box that will open with the warp feature. Now you click on the image and you will see "arrows" all around the box. By clicking on these arrows, this now is the "warp" feature. You will need to click on it through a three-part cycle. The cycles are the "sizing", the "rotation" and the "warping". Click on the arrow until it allows you to get to the function you want to perform.
The Boolean Join function has changed slightly. Instead of a box coming up and having a preview in the box, the "preview" is now directly on the mat. Once you have your two images selected, and click on the Boolean button a small line box will come up. When you go through the different choices it will put the choice on the mat for you to see, if you decide you like the feature, then click on the mat to accept it. If you find that those choices do not work for what you are wanting to do, then just click the "X" on the box and it will restore your image back to what it was before you started the Boolean join.
There is a "Snap" function which I have not had a chance yet to play with, so not quite sure I understand what that does....well not yet anyway. Will be playing a little later.
A couple of things missing on this version and hoping Andy (the creator of MTC) puts these back in are the "Select All" button on the Shapes toolbar, the Scale is gone which was used to make an image an exact size.
I am not quite sure at this time if I will make tutorials for these changes, as Andy stated that he is working on a manual to put out. So will see....
Back to playing.....
EDITED: .....The Snap feature is soooo cool....it is like an invisible ruler, and when you "slowly" move your image it will move over/down/up, etc in the increments you have chosen. If you choose 1 inch, your image will move 1 inch everytime. If you choose 1/8 inch it will move by 1/8 inch as you move it. The KEY TO THIS is you have to move it slowly to see the effects....if you move the image to fast it will not really "register" as to what it is doing.
Also the "nudge" feature works differently now...you just use the arrow keys (up/down/left/right) to move "nudge" the images.
Love this new version.
Monday, March 8, 2010
Pebbles and BamBam
I can remember the first time ever watching the Flintstone cartoons. I was around 5 years old and watched it when it first came out in PrimeTime television. The Flintstones have ALWAYS been my favorite cartoon, even bought a Seasons worth on DVD's.
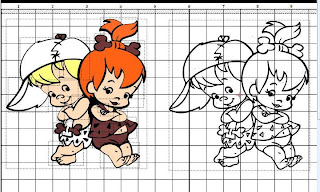
I have traced this image in MTC! as a file for sharing. If you would like this file, click HERE to download. ****Please make sure to read the NOTES section of the file before working in this file. I have already did the work for you and the notes will tell you how to move the pieces.***
Please check back again as I will be adding lots more of these images....the whole family as a matter of fact.
More Wall Art for my Work Office
We just moved into our new office building mid-December and already the middle of the building in some offices and hallways has developed a crack. My office is one of those. They have repaired the "cracks" in the hallways, but I believe they have forgotten about the offices. Everyone that stops by says....did you know you have a crack in the top of your wall.....well yeah.....So I decided to do a little more art on my wall to show off maybe the "humor" in the crack......(So, drip, drip, drip.) What do you think....see the humor? LOL!!!


A close-up shot:
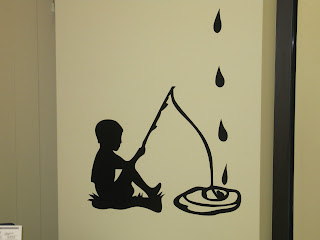
Everyone that has stopped by this morning is laughing and loving this...... (I have laid the water drops in the open spaces so that I could save on the vinyl (Well contact paper-Black Faux Contact Paper purchased from Home Depot.) The water drops were easy to just pull off of the backing....no need for transfer paper for them...so cut them out and just use the transfer backing on the little boy and pond.

Everyone that has stopped by this morning is laughing and loving this...... (I have laid the water drops in the open spaces so that I could save on the vinyl (Well contact paper-Black Faux Contact Paper purchased from Home Depot.) The water drops were easy to just pull off of the backing....no need for transfer paper for them...so cut them out and just use the transfer backing on the little boy and pond.
Hope you enjoyed this, and if anything got a laugh for the day.
Have a great day.....and will be having more things to share soon.
Europe Shape Book

I am still continuing to work on the shape book I have started. Here is the first picture of just the pages cut out of the white poster board (trying this instead of the grey/brown chip board). I spent a lot of yesterday afternoon cutting out the page layers and need to finish a couple of more pages, then once I adhere those will probably show an "update" picture as I progress.
To see how this turns out....check back again soon.
Sunday, March 7, 2010
MTC files to share
Here are a few of the images I imported from clip art into MTC and created the MTC file so that it can now be cut in MTC. I have also attached the files for sharing, please use them for personal use.
Precious Moments Bunny Rabbits


Clifford the Big Red Dog

Again...for these files are shared for personal use only.
Written Tutorials for Make The Cut! Software
I have written several tutorials for the Make The Cut! software. Below is a list of what I have currently written. You can click on the links to view the written tutorials.

*********************************************
**The Main Objects and Properties Box tutorial was written on an earlier version of MTC. The first half of this tutorial is still correct the second half on the Object Properties box is no longer correct. This box has been replaced with the Selections Property Box, which does allow you to size your image to the size you want, to proportion and to use the x and y axis to place your image on the mat. If you have any questions leave me a comment and I will be glad to help.
I hope that you will find these tutorials helpful. Please check back often, the creator "Andy - Tucirc" of Make The Cut! is coming out with an updated version 2.0 very soon. I will have more tutorials to share on the new features that will be added.
Have a great day!!
Thursday, March 4, 2010
Make the Cut written tutorials
Over at the MTC forum, I have shared the MTC "Owner's Manual" that I have written. I have decided that I will also add this to my blog. Now all I have to do is figure out how to include this, maybe as a post and as a link to where I have them stored.
Watch for these to come shortly.
Update: Still need to share the Europe Shape Book I am working on. I haven't had much time lately to work on it. I did get it designed and cut out using the MTC software and my Cricut Expression. I am trying something a little different this time. Instead of using the "brown" looking chip board, I wanted it to be white. So I bought the poster board that is in sheets about the size of the Cricut mat to cut out. It is a little flimsy, but I am going to see how it works once I start gluing the thicker cardstock onto it. So that is where I am at with this project for now.
Subscribe to:
Posts (Atom)