Welcome to My World on the Net!!

Thanks for stopping by!! Take a look around, hopefully you will find something you like or can use!!
***All .mtc files are layered and ready to cut. Any .svg files are ready to be worked on-not layered for cut. ***

Sunday, November 7, 2010

Baby Shower Diaper Cake

I decided to make a diaper cake for my daughter's upcoming baby shower. Take a look, hope you like the pics.

FRONT VIEW 


BACK VIEW


LEFT SIDE


RIGHT SIDE

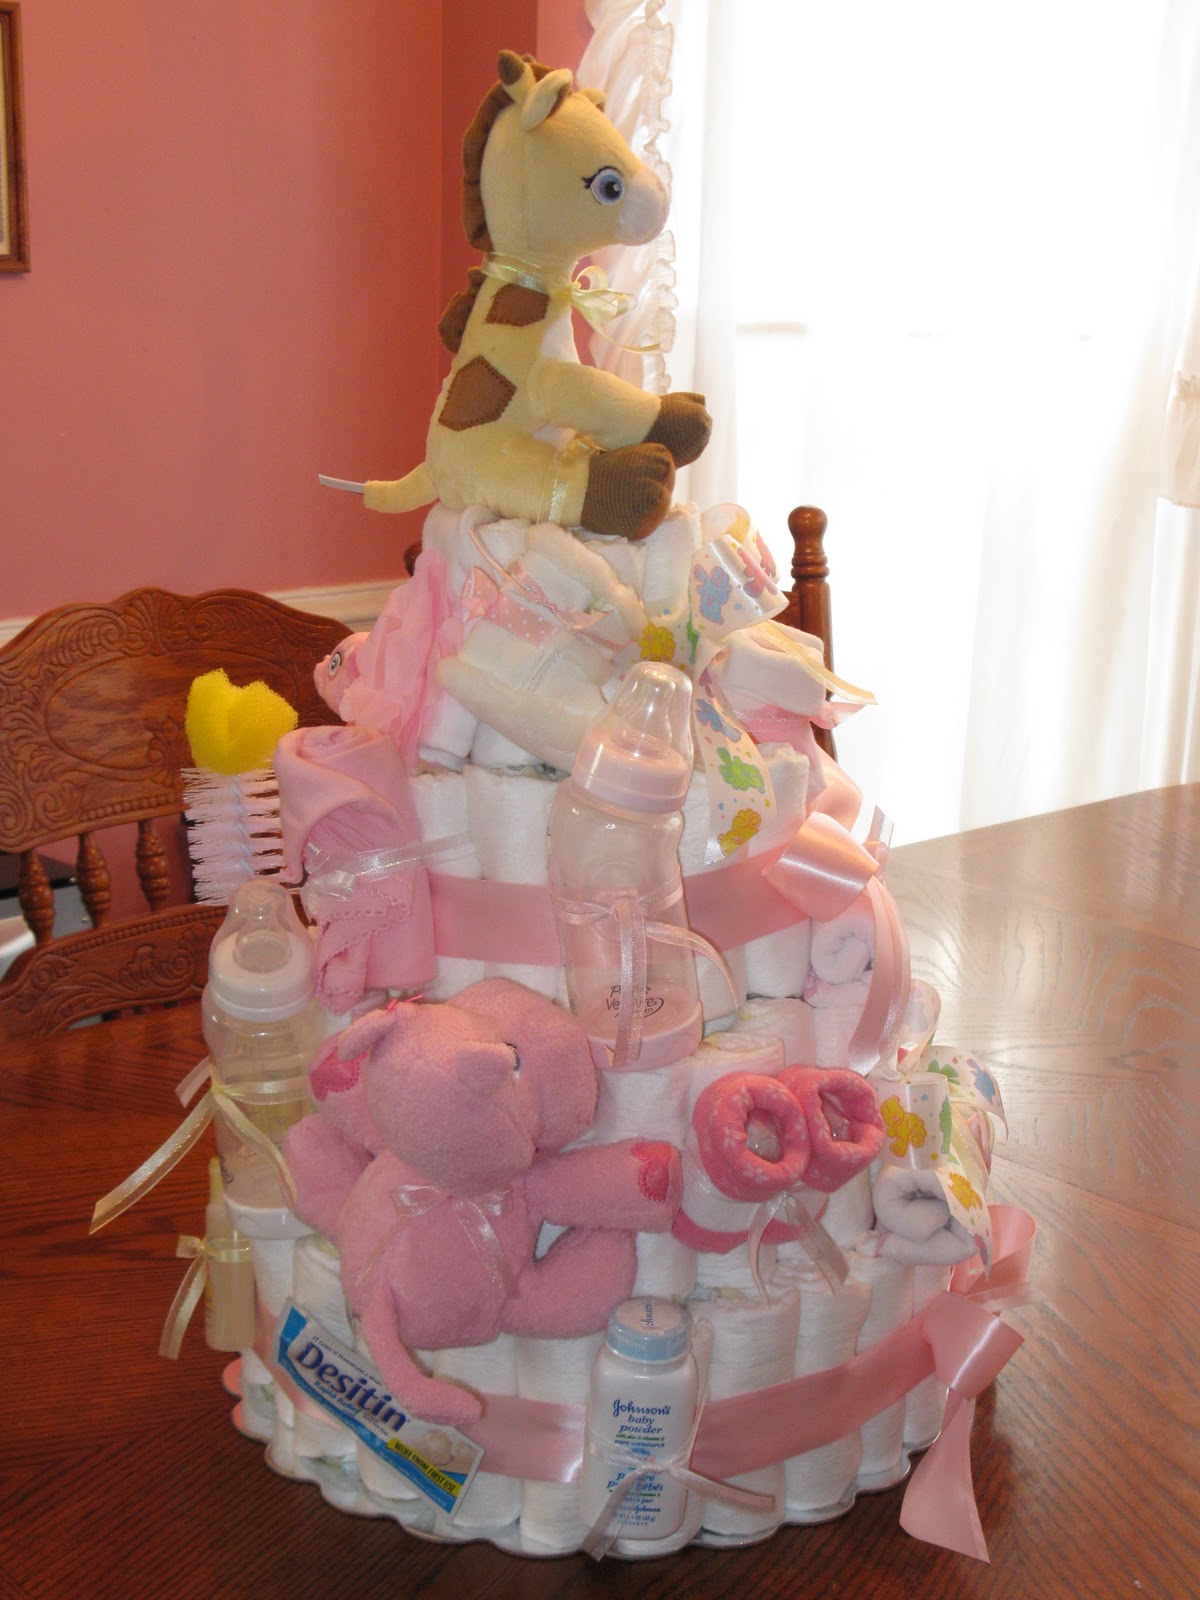
To make this I used 8 diapers on the top tier, 22 diapers on the second tier, 44 diapers on the third tier and 66 diapers on the bottom-fourth tier.

To make this I rolled a Pampers size 1 diaper from the open waist edge to the crotch edge. Secured it with a rubberband. Once I had 8 done, I placed one in the center and surround it by the other 7. I then secured them all together with another rubberband. This was my first tier.

For the next tiers I followed the above and made another 8 diaper circle then I stuffed additional diapers in between to make another outer layer around the seven. This become my second tier. For the next two tiers I did the same thing just adding another outer layer around each time to increase the layers.

Using a cardboard cake platter found in the cake decorating department I placed the fourth layer on top. Then I placed the third tier on top of the fourth tier added two dowel rods down the layers on opposite sides. This helps keep the layers together. Then I added the second tier on top of the dowel rods and then the top layer. I placed wide ribbon over each layer to hide the rubber band. And then added a big bow with the matching ribbon. I then used thinner ribbon to secure different baby items all around the cake. After it was all completed I wrapped the entire cake in tuille (pic not shown) with a big bow on top to deliver it to the baby shower.

This was a lot of work but the end results were so worth it. I think it turned out fantastic. Hope you like it and are inspired to try one yourself.

Baby Shower Stroller Decoration

This baby stroller was created in the Make the Cut software and cut out with my Cricut. I am not the creator of this wonderful idea. It was shared with me by a wonderful person over on the Make the Cut forum: Rachellann. Rachellann designed this file and shared it with me so that I could make one for my daughters upcoming baby shower. Someone on the forum suggested that it could sit on the refreshment table and hold either nuts or mints.


Thanks Rachellan for sharing this file. If you would like to see this file or other creations she has made you can visit her on her blog: rachellsmanycrafts.blogspot.com or over at the Make the Cut forum: make-the-cut.com.

Baby Shower Treat Holders

Baby Bootie Treat Holders

I made these Hershey Kiss treat holders for the refreshment table for each party guest attending my daughter's baby shower.


To make these treat holders, you will need a beverage size paper napkin, plastic disposable bathroom cup, three cotton balls and ribbon approx 13 1/2" long. Unfold the napkin, place the cup almost in the middle of the napkin. Place the three cotton balls beside of the cup to form the toe section of the bootie. Pull the paper napkin up over the cotton balls and the cup, stuffing it into the inside of the cup. Tie the ribbon around the middle of the cup, ending with a bow. Fill with Hershey Kisses (takes about 7 pieces for one). Makes a cute treat holder to add to any baby shower. Make one for each guest coming.

Monday, June 14, 2010

Daisy Border, Corner "Punch" and Daisy Frame

Here is a Daisy Border and corner "punch" that you can use to make any borders or even Frames. I created the 4x6 frame to show how this can be done. If you need a smaller border, use a cutting shape and change this from 6 or 4 to 2, 3, or 5 daisies. Add two of the 6 daisy borders together to create a 12 inch border. The possibilities are endless. To create the frames just use the copy, mirror, flip and weld functions in MTC.
Enjoy!!
If you would like this MTC file click HERE.
If you would like this SVG file click HERE.


Wednesday, June 9, 2010

Update.....

Hi all,
been away a little bit doing the vacation thing. We went to Myrtle Beach for the last week of May and had a blast. But then of course once vacation is over you sorta have to make up for it at work because that weeks work doesn't stop.

So I haven't had a chance to post for a little bit.....BUT......

 I will be very shortly as Make the Cut has now come out with another update. It is still in the Beta version...but Andy has really out done himself with this newest version. Take a peek at what he has done: HERE-Make The Cut!

NOTE: This new update is still in the Beta Test version, so if you haven't downloaded the prior version or the trial do that first and play with that. Experienced users are trying out the new Beta update to work out any "kinks" before Andy actually releases it to everyone.

I am so ready to play with this new version and will be sharing some more info (maybe even some new tutorials) very soon.

Check back for some more free files that I will be adding soon.

Sunday, May 16, 2010

CyberCrop Weekend

This has been a busy weekend of crafting. Over at the MTC forum, I participated in their first ever CyberCrop weekend. There were 10 Challenges and 9 Bonus Challenges. You had to do a separate project for each challenge. I was only able to get 7 out of the 10 Challenges completed. Hey but that is more crafting in a weekend than I think I have ever done. LOL!!!

See below for my projects.

Challenge #1 - Color Challenge. Use only the colors Purple and Turquoise (white/black could be used for any journaling).


Challenge #2 - Create a title in MTC with a graphic attached to the words.


Challenge #3 - Create a project using vinyl.


I did not get to Challenges #4 & #5.

Challenge #6 - Paper Piecing. Create a paper piecing piece using MTC.
(note: This is the little lamb from the Strawberry Shortcake series I shared.)


Challenge #7 - Create a project using an animal theme.


Challenge #8 - Use three flowers on your project.
(Made this Get Well Card)


I did not get to Challenge #9.

Challenge #10 - Use metal or embossing.
(I used my cuttlebug and nestability embossing dies
for this birthday card.)


Well, that was my first ever online crop and it was a lot of fun. I am looking forward to participating in many more. Want to join in on some of the fun, join us over at the Make the Cut forum.

Saturday, May 15, 2010

Strawberry Shortcake (the New Series)

Here are a few files from the new series of Strawberry Shortcake. Hope you like them. You can download the layered .mtc file that is ready to cut, or the .svg file.


New Strawberry Shortcake.mtc - Click HERE
New Strawberry Shortcake.svg - Click HERE

New Huckleberry Pie.mtc - Click HERE
New Huckleberry Pie.svg - Click HERE

New Orange Blossom.mtc - Click HERE
New Orange Blossom.svg - Click HERE

Strawberry Shortcake Pets.mtc - Click HERE
Strawberry Shortcake Pets.svg - Click HERE

Friday, May 14, 2010

New Series of Strawberry Shortcake

In the next day or two I will be adding several characters from the new series of Strawberry Shortcake.
Check back soon.

I hope you enjoyed the vintage characters, please let me know what you think of them.

Strawberry Shortcake

Strawberry Shortcake.mtc - Click HERE
Strawberry Shortcake.svg - Click HERE


Strawberry Cake.mtc - Click HERE
Strawberry Cake.svg - Click HERE

Stawberries.mtc - Click HERE
Strawberries.svg - Click HERE

Thursday, May 13, 2010

Orange Blossom

Orange Blossom.mtc - Click HERE
Orange Blossom.svg - Click HERE

Orange with Blossom.mtc - Click HERE
Orange with Blossom.svg - Click HERE

Basket of Oranges.mtc - Click HERE
Basket of Oranges.svg - Click HERE

Keep checking back this week,
more to come!!

Wednesday, May 12, 2010

Lemon Meringue

Some of these files have a lot of small pieces, so remember to use my tip in todays post to work with all of the small pieces.

Lemon Meringue.mtc - Click HERE
Lemon Meringue.svg - Click HERE
  
Lemon.mtc - Click HERE
Lemon.svg - Click HERE

Lemon Halved.mtc - Click HERE
Lemon Halved.svg - Click HERE

Lemonade Stand.mtc - Click HERE
Lemonade Stand.svg - Click HERE

Tip on working with Layers and small pieces

TIP: When working with files with lots of small pieces for layers.....after you have cut the section of the file that has lots of little pieces that look alike, leave the pieces on the mat.


Take the pieces off one at a time and glue them at that moment onto the background piece or where they are to be placed.


This way it makes it easier to place them exactly where they go and you don't have a lot of loose, little pieces all over your work area to try to remember later which piece goes where.


Hope this tip helped.

Tuesday, May 11, 2010

Huckleberry Pie

Here is another Strawberry Shortcake Friend. You can download the .mtc file which is layered and ready to cut or resize. Or the .svg file which is just the image.

Huckleberry Pie.mtc - click HERE
Huckleberry Pie.svg - click HERE

Basket of Huckleberries.mtc - click HERE
Basket of Huckleberries.svg - click HERE

Huckleberry Pie Plate.mtc - click HERE
Huckleberry Pie Plate.svg - click HERE

Check back tomorrow for another Friend.

Monday, May 10, 2010

Apple Dumplin

Welcome to Strawberry Shortcake week!!

This week I will be posting several of the Strawberry Shortcake characters for use with MTC. You may download these .mtc or .svg files for personal use only. Check back each day for more characters.


Apple Dumplin .mtc file-click HERE
Apple Dumplin .svg file-click HERE


Full Apple .mtc file-click HERE
Full Apple .svg file-click HERE


Apple Halved .mtc file-click HERE
Apple Halved .svg file-click HERE

Sunday, May 9, 2010

Happy Mother's Day Everyone

Hi Everyone, I hope you had a wonderful Mother's Day. I sure did. My family is so thoughtful.

My daughter Brittney and her boyfriend Miles brought me these balloons, an Edible Fruits basket arrangement and a teddy bear from Edible Fruits.

My husband brought me this bouquet of flowers and cooked dinner for me. Yum, Yum!!! He did a really good job.


My son Tommy and his girlfriend Meya got me these balloons, picture, card and flowers for Mother's Day.


I hope you had just as nice a Mother's Day as I did. This was an awesome day!!
Have a great week!

Tuesday, May 4, 2010

Challenge #5 - Pet Adoption


Okay here is my entry for the Challenge #5 over at the MTC Forum MB. If you would like this file click HERE.


Sunday, May 2, 2010

Things to make for a Tea Party

Saturday, May 1st I helped with putting together a Mother-Daughter Tea Party for our Girl Scout District. We had 92 participants. One of the my duties was to create the teabag holders and a Bingo game. I spent all of last week cutting and putting these together for each participant. You can see the pictures below to see what I came up with.

Teabag Holder. I used pastel cardstock, ribbon, Glue Dots (the strips), and teabags. I cut the file from my .mtc file and then scored on the score marks. Actually I used the first scored one for a guideline, then removed the scorelines on my mtc file to cut the rest and just measured with my Scor-Pal and scored the lines - much neater. Then adhered the teabag to the back section at the top of the teabag with a Glue Dot strip . Then used a 3/16 inch punch to punch two holes at the top above the scalloped edge and added ribbon. Then added another Glue Dot strip along the top section of the panel with the cutouts, to close/seal the holder.
If you would like this Teabag Holder mtc file, click HERE.


Teapot Bingo Cards

Teacup Bingo Cards

For these Bingo Cards, I used the same matching pastel cardstock. And cut the teapot and teacup from my .mtc file. I then created the Bingo Cards in Excel and changed the heading from B-I-N-G-O to I-(heart)-T-E-A.
* * *
* * *
If you would like the Teapot Bingo Card, click Here.
If you would like the Teacup Bingo Card, click Here.
If you would like the Excel Bingo Cards, click Here.
* * *
* * *
This Excel Bingo Card file can actually be used for
any type of party where a Bingo game is needed.
* * *
The Excel Bingo Card file has three tabs to click on. The first tab is the callers sheet. There are two call sheets on it. I printed this out on white cardstock to make it sturdy. One of the call sheets, I cut all of the squares so that those would be my Bingo numbers to call out. The second tab has 80 different Bingo Cards. The third tab has a few extras.
* * *
***If you download this file for use, you can change the "Bingo" title to whatever the theme of your party is and change the "graphic" in the Free Space to the theme of your party.
Hope you find these files useful.
If you would like to see some pictures from the event, click on the play button below.

Friday, April 30, 2010

PM Teddy Bear

I haven't been here in a few days. I have been busily creating things for a Mother-Daughter Tea my Girl Scout district is hosting this Saturday. I will be sharing files for a Bingo Card and a Teabag Holder I have made. So remember to check back after Saturday to have a look.


For now, I wanted to share this little bear that I traced into the Make the Cut software from another coloring book page. Remember all of these files are for personal use only. The pieces are "locked" in the layers section of the software, so remember to click on the "unlock" when you get ready to cut the pieces.
Click Here to download the .mtc file.
This file can be cut with the Make The Cut software and several types of electronic cutters.

Sunday, April 25, 2010

One more Shape Card to share

Here is my second card I made for the Shape Cards challenges. This one is a tri-fold card. I had already stamped this Tilda stamp image onto cardstock and had colored it with my Copic markers, but didn't know what I was going to do with her yet. So I thought about adding her to a card. I was having a hard time thinking about a "shape card" to do then it hit me....why not make Shape cards using the same concept as the Shape books. So this is what I came up with. I traced my Tilda image into the MTC software to create this card.

If you would like to know how to add "stamped" images to Make the Cut, check out my written tutorial: Using Stamped Images in Make the Cut, in my tutorials section. Same concept as the tutorial.
I sponged inked the sun with an orange and red ink pad. The clouds are cut from vellum. The rock is a textured paper. The flower, I cut out four layers and put them together using a brad. Before putting together, I ran the separate pieces through my Cuttlebug with the Swiss Dots folder. The fence was also done with a "woodgrain" paper. I used the Peachy Keen face stamps for the nose/mouth on the Tilda stamps and for the face on the sun.


Hope this card inspires you to try to make Shape Cards.

Shape Cards Challenge

Over at the Make The Cut forum, this weeks challenge is to make a Shape Card. Also there is another challenge going on for Card Angels to send cards to a little girl named Cheyenne who is very sick. So this is one of two cards I made for both of these challenges. This entire card was made with the Make the Cut software, my Cricut Expression and Stickles.


Monday, April 19, 2010

Precious Moments Lion

This little lion is from a Precious Moments coloring page. If you would like the Make the Cut cut file, click on the link below.

Click HERE.