Hi All,
just wanted to say thank you to all that left a comment. It is truly appreciated and I am glad to share these with you.
Now I started to just answer this comment, but thought ....Uhmmm, others may want to know too. So....
jjred40 said...
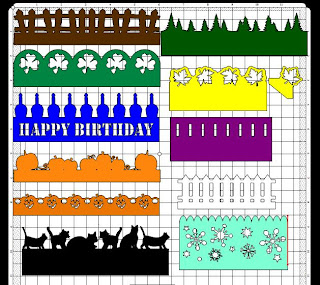
thanks for sharing your awesome borders - how did you do these. I played around after watching Rob's video but didn't come up with anything this cute. How did you get the words inside the border? Thanks for sharing. Here was going to be my response but sharing in case others were wondering also:To get the words inside the border: You just type in the words in the add text group box and then place it on your mat. Then move/drag the word(s) "inside" of the border (rectangle) where you want them to be. Then you select all of the "rectangle/with words" and then just click on "join".....they are now in the border like the one in my Happy Birthday border.
PS.....I used the stencil font for this one. Remember when placing letters inside, think of how they will cut out. For instance an "a" the inside will be cut out so that you just have the edge layer....so you would have to somehow keep that inside to glue in place. The stencil font works great for these though.As far as the other images. Just add them to your mat then place them along the border they way you want them placed. Make sure a little of the bottom edge of the image is touching the top (or bottom if you have the image descending) and once you have them overlapping "just a little" then select all of the border/images in one selection box, then do a weld. This makes it all one piece.....PS....you do not want to add any words until you have finished the weld....so that you can do a "join" with the letters. If you add the letters first "inside" of the border and click on weld they will disappear and be welded into the border.
Hope this helps with some questions about how to make these borders. The possibilities are whatever images you choose to work with....just think of a "theme" and go for it!!!


 On this layout I used mtc to create and cut the cat border and the large spiderweb. I used silver stickles on the spiderweb. I used a Tilda stamp (from Magnolia stamps) and colored it with the Copic markers. I also used the Martha Stewart Punch around the page - spiderweb punches around this mat and then added a couple more mats with ribbons.
 Click HERE for the .mtc file